Top Floor
That would be the top floor of my hotel, I had at one time thought I
had finished this diorama but a ball and the wonderful English weather had other ideas.
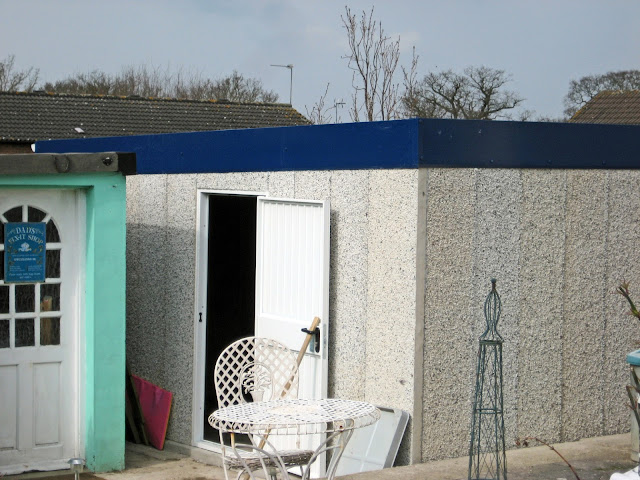
My doll room is a purpose built building separate from my house and is supposed to be a garage, but I had it built without the window and garage door. So anyway a ball got stuck in the top of the drainpipe I never noticed and water seeped into the back wall.

Well I noticed in the end but by then it was to late! So ball removed and wall left for a month to dry out. Everything on the upper three shelves along the back wall was removed and once the wall was dry painted with a gloppy anti mould stuff, then painted white.
The top floor is a car park so pretty easy to re-do.


Below then on the left was the hospital this just needed a few adjustments and was fine. The Children's and Birthing Room


The rest of this floor is taken up with the top floor of my hotel. Now these walls took the brunt of the damp and the back walls were unusable. First up was a small single bedroom and while redoing everything I decided to change things around a bit. In the original set up I imagined the doors to be on the side you look in on (so no doors) but I want to put a front on my buildings and this would require windows and not doors as you are looking in.


So the room got a small change around, now not so much furniture but I think it looks better? I even overcome my 'door phobia'. The wall are all foam core board, I have been using 5mm BUT this does curve a little after a while so this time I went for 10mm board. I'm hoping this will work better.

I have a massive stash of sample wallpaper and I use extra thick ready made wallpaper paste. I do also leave the boards to dry off for 24 hours and I put the boards under my large cutting mat to hold it flat.
 The new single bedroom

Still needs a TV shelf and ceiling light, I was also thinking of putting in another door to look like it leads to a bathroom? I also need to add a 'In Case Of Emergency' plan on the door.
Moving on to the penthouse these back walls were almost bent double and was trashed. I like the idea of a fancy smancy white penthouse. Again I used thicker 10mm board. I also changed things around so the door was on the back wall and windows can now go across the front.

Another thing added to the new updated room was wardrobe space not sure why it was not included in the original, I think I might need to fire the designer... oh, wait that would be me, maybe not then! This is the new walk in wardrobe I need to add a new full length mirror (can't find it at the moment). The shelving unit is movable and the rails adjustable

So thicker walls new wallpaper and a few adjustments later along with double doors, can't forget those doors and the new suite is done.

To make the rooms look lighter I used Plexiglas. You don't need to be able to cut this yourself as there are many places on line where you can order it. It comes in many, many colours, clear or frosted.
Some more pictures of the whole penthouse


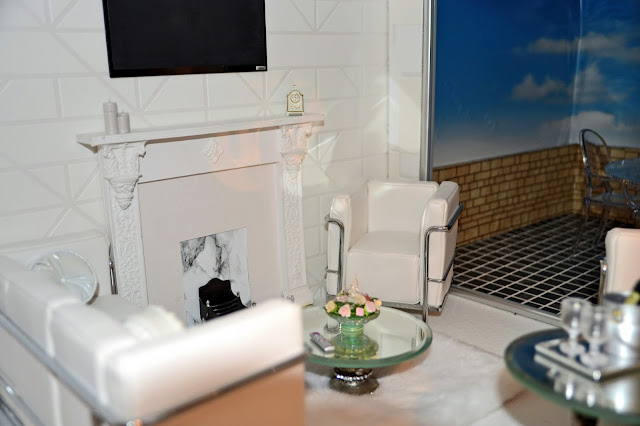

 You can see the crumpled sky still to be changed but as it is all fixed in I might just leave it for now.
 You even have a small kitchen for the maid to make you a cup of tea or finish off those meals prepared downstairs in the five star restaurant.
 I have a door template ready made so for a double door.. just double the width and add a 1 cm at top and 2cm to the width. For the door base I use a thick-ish card.


 Cut two doors the same size as your template. Cover the base card with sticky back plastic.
 Mark up the two doors as above and cut out the centres
 Cover the doors with the same sticky back plastic. Glue doors to base.
 For the frame I use 3mm foam core board cut into 1cm strips. I mark and cut the top strip at right angle and mark the sides so they butt together
 Glue edges on and I put finished doors under a heavy book or cutting mat until dry. For doors handles ...beads, push pins or mini handles for doll houses can sometimes work. I used grey push pins as you can see in the picture further up.
 Now just a note: Glue there are as many types of glue as there are people I often think and all have their good and bad points. I never use super glue as I'm a messy person and using super glue would put me on first name terms with the doctors and nurses at my local hospital Emergency Department!!!! Other glues often are not strong enough and Gorilla glue puffs up so would look messy. I have found EVO-STIK Serious Glue works very well, it's a little like super glue but has about a two minute adjust time. After 24 hours it's rock solid and so far nothing has come un-stuck. (It's also waterproof and I used it to fix a leak in the pool!)

A few extra photo's of the penthouse


My doll room is a purpose built building separate from my house and is supposed to be a garage, but I had it built without the window and garage door. So anyway a ball got stuck in the top of the drainpipe I never noticed and water seeped into the back wall.

Well I noticed in the end but by then it was to late! So ball removed and wall left for a month to dry out. Everything on the upper three shelves along the back wall was removed and once the wall was dry painted with a gloppy anti mould stuff, then painted white.
The top floor is a car park so pretty easy to re-do.


Below then on the left was the hospital this just needed a few adjustments and was fine. The Children's and Birthing Room


The rest of this floor is taken up with the top floor of my hotel. Now these walls took the brunt of the damp and the back walls were unusable. First up was a small single bedroom and while redoing everything I decided to change things around a bit. In the original set up I imagined the doors to be on the side you look in on (so no doors) but I want to put a front on my buildings and this would require windows and not doors as you are looking in.


So the room got a small change around, now not so much furniture but I think it looks better? I even overcome my 'door phobia'. The wall are all foam core board, I have been using 5mm BUT this does curve a little after a while so this time I went for 10mm board. I'm hoping this will work better.

I have a massive stash of sample wallpaper and I use extra thick ready made wallpaper paste. I do also leave the boards to dry off for 24 hours and I put the boards under my large cutting mat to hold it flat.


Moving on to the penthouse these back walls were almost bent double and was trashed. I like the idea of a fancy smancy white penthouse. Again I used thicker 10mm board. I also changed things around so the door was on the back wall and windows can now go across the front.

Another thing added to the new updated room was wardrobe space not sure why it was not included in the original, I think I might need to fire the designer... oh, wait that would be me, maybe not then! This is the new walk in wardrobe I need to add a new full length mirror (can't find it at the moment). The shelving unit is movable and the rails adjustable

So thicker walls new wallpaper and a few adjustments later along with double doors, can't forget those doors and the new suite is done.

To make the rooms look lighter I used Plexiglas. You don't need to be able to cut this yourself as there are many places on line where you can order it. It comes in many, many colours, clear or frosted.
Some more pictures of the whole penthouse

You can see the light for the ceiling still to go up it's a snowflake. I need to find the tap for the wash basin as well.


I used a picture frame as a door frame leading onto the terrace


..................................................
Easy double doors


I had a question about keeping the cuts clean when cutting foam core board so I thought I would add......
- You need a metal ruler and a very sharp knife. I sometimes score it first then a deep cut. I have a 34" by 20" cutting mat and a 32" metal ruler designed for cutting foam core. My knife is a cheapo one but it has the snap off blades and as soon as I feel a little pull when cutting I change it.
A few extra photo's of the penthouse


.JPG)
I love the wood grain effect you got on the furniture in the single bedroom!
ReplyDeleteThank you, yes it's a great effect and try as I have I can't find any more!
Delete