Prams/ Stroller or what ever you call it!... Painting Plastic
I have a little bit of a thing for 'babies' Barbie and co babies that is. I also love prams/buggies/strollers or whatever!
For some time I had wanted a mini pram like you see so much in human size these days. Imagine my excitement when I spotted the new Skipper Babysitter Inc pram, it looked (almost) perfect. As soon as I spotted one on Amazon I had to get it AND it was not silly expensive. The pram's come in yellow with a white baby and pink with a black Baby.


 (Not my photo's)
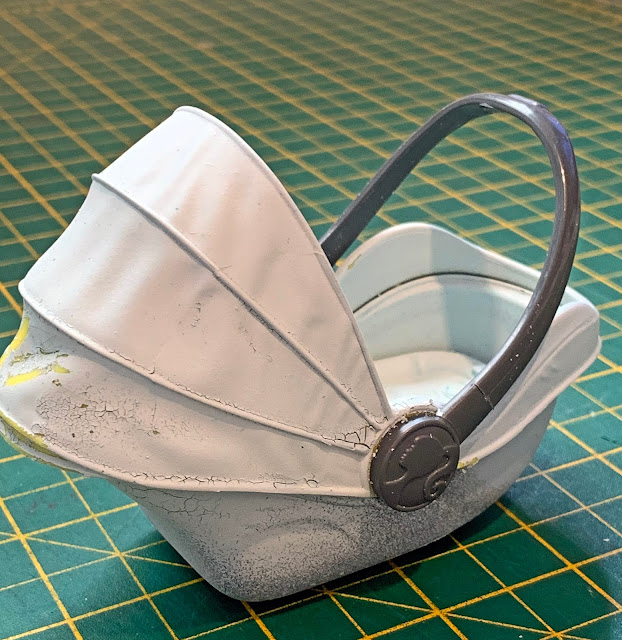
For some reason the pink pram is very hard to find in England, but I did find one on Amazon. The height was good too and worked well with the taller IT dolls. As you can see I painted mine


So next the painting thing
The base parts come apart pretty easy but the top peace (bucket) can not be taken apart.
I wanted to paint the top of the bucket but leave the base grey. All the parts I did NOT want painted I coated with a couple of coats of school PVA glue
 While that dried I looked at the wheels and decided to add a little fancy silver (chrome) There are many painting pens around you just need to make sure they are permanent.


Back to the pram bucket, first I sprayed with a plastic primmer

Spray fine and a little at a time if you are to heavy handed then you will get runs. If you have never used spray paint before then you might want to practice on something first.
 The world is your Lobster when it comes to colours. Now one spray you do NOT want to use is chalk effect spray (see bellow)
 Once you have sprayed you layers and are happy with the result leave 24 hours to really dry. Then it's time to remove to sprayed glued parts. This should just peel of pretty easy.
Once I was happy with my bucket I gave it a spray with sealant.

Now you might have noticed looking at my above photo's you might have noticed I have also re-painted the basket (above in pink) now dark grey. I left the handle and the other dark grey parts but sprayed the rest to look like chrome.


Then I chrome edged the buckets.
This again you need to be careful I was a little heavy handed and the first were a little thicker than I would have liked.
Finally I added an inner pad for the baby to lay on. I used a peice of newspaper to cut out the shape. Then once I had the template right I cut out white foam to shape. I then found some 'towelling' foam love it!


I used the same PVA glue to coat the base of the bucket and then sprinkled with a fine gold glitter.Then I added some crystals for extra BLING!


Just as an add on.....
I was not happy with the babies supplied as I felt they were too big. If real I think any new parent would have a VERY bad back after carrying them around for any time. So I used the smaller babies from past sets (pregnant Midge types). Also doll house babies work.


I have been learning to knit so made a whole heap of little pram bags to keep baby snugly through the winter.


 And once summer gets here I've started to make some little blankets.

Finally no photo shoot is complete without a cat

For some time I had wanted a mini pram like you see so much in human size these days. Imagine my excitement when I spotted the new Skipper Babysitter Inc pram, it looked (almost) perfect. As soon as I spotted one on Amazon I had to get it AND it was not silly expensive. The pram's come in yellow with a white baby and pink with a black Baby.


So next the painting thing
The base parts come apart pretty easy but the top peace (bucket) can not be taken apart.
I wanted to paint the top of the bucket but leave the base grey. All the parts I did NOT want painted I coated with a couple of coats of school PVA glue


Once I was happy with my bucket I gave it a spray with sealant.

Now you might have noticed looking at my above photo's you might have noticed I have also re-painted the basket (above in pink) now dark grey. I left the handle and the other dark grey parts but sprayed the rest to look like chrome.


This again you need to be careful I was a little heavy handed and the first were a little thicker than I would have liked.
Finally I added an inner pad for the baby to lay on. I used a peice of newspaper to cut out the shape. Then once I had the template right I cut out white foam to shape. I then found some 'towelling' foam love it!


I decided to BLING a gold one
I used the same PVA glue to coat the base of the bucket and then sprinkled with a fine gold glitter.Then I added some crystals for extra BLING!


Just as an add on.....
I was not happy with the babies supplied as I felt they were too big. If real I think any new parent would have a VERY bad back after carrying them around for any time. So I used the smaller babies from past sets (pregnant Midge types). Also doll house babies work.


I have been learning to knit so made a whole heap of little pram bags to keep baby snugly through the winter.


Finally no photo shoot is complete without a cat


.JPG)
Hahahahaha! This is all adorable, I was wondering what you were going to do with your warm stint of weather...spray your brains out...grins, so cool!
ReplyDeleteYes, lots of spraying and outdoor photo's!
DeleteLove them all, but my fav is the Gold one - I'm a "blingy" kind of girl LOL - thanks for sharing all the tips, especially the one about the glue!
ReplyDeleteThank you, Annette
DeleteOmg I’d love a boy one and girl one
ReplyDeleteThank you
Delete